这个mdschool app 我老早就打算研究。本周末的pwnhub的题目好难,而且还是web,我完全不会,所以干脆研究这个好了.
觅动校园 app研究记录
我第一次是从网上直接下载了apk然后进行观察,发现这个apk完全不能用啊,里面都是qihoo的保护内容,而且又是喜闻乐见的动态加载。总不能自己解析这个数据包吧,所以第二次,我就将app直接从手机上传到了电脑上(一开始还root啊各种花式操作,然后发现qq自带这个功能。。。)
首先将文件解压,然后将里面的.dex文件使用dex2jar转换成了jar文件,里面的内容大致如下:
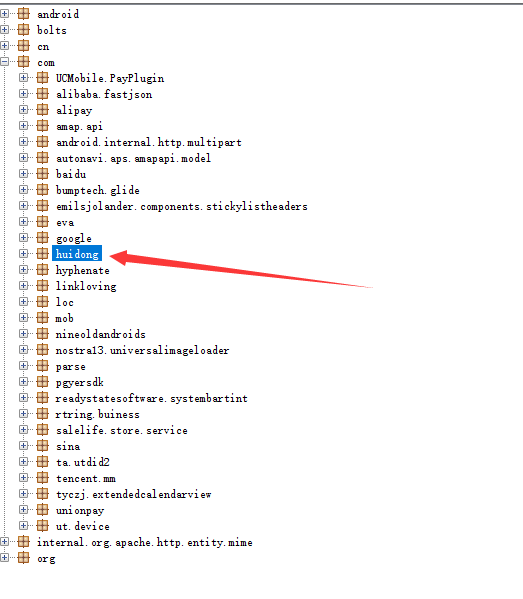
仔细观察,发现这里的类中,只有一个叫做"huidong"的package比较可疑,其他的数据似乎都是辅助。然后我们来看看里面的文件结构:

箭头指向的这个很可能就是我们需要了解的觅动的相关函数,pbl是android app启动的时候用于初始化物理设备,引动系统内核启动的;zxing是实现二维码扫描的;meetwalk里面放置似乎是。。让我们想一想,觅动校园里面的主要功能分为:
- 大家都不喜欢的打卡
- 部分同学使用的正常社交功能
如果说,箭头指向的位置表示的是**【觅动】本身的社交功能,那么这个meetwalk可能就是记录行走相关的类**。回想一下我们这次研究的最终目的,有一个就是找出打卡的真实过程,那么我们就很有必要好好研究一下这个package:
这个package内部是这样的:

GPSStepCountActivity.class
这个类中记录了【打卡过程】,里面有【当前的打卡状态】,以及【打开的逻辑判定】
GPSRouteActivity.class
这个类记录的是【打卡是否完成】,以及提交的方位。
通过搜索关键字**【保存提交】**,我们会将提交功能定位到目标函数:
1
| private void savePoints()
|
函数的最后有以下内容:
1
| GPSRouteActivity.this.http.httpRequest(5307, localHashMap, false, SaveRouteResult.class, true, false);
|
这个函数将会把我们的跑步数据上传到网上。也就是说,这个过程中有可能能够找到我们平时的数据都上传到了哪里。
接下来我们顺着访问httpRequest函数:
1
2
3
4
5
6
7
8
9
10
11
12
13
14
15
16
17
18
19
20
21
22
23
24
25
26
27
28
29
30
31
32
33
34
35
36
37
38
39
| public void httpRequest(int paramInt, Map paramMap, boolean paramBoolean1, Class paramClass, boolean paramBoolean2, boolean paramBoolean3)
{
Log.e(paramInt + "请求参数", paramMap.toString());
if ((OnClickUtil.isMostPost()) && (lastRequestType == paramInt)) {
return;
}
if ((this.mContext instanceof BaseActivity)) {
if ((paramBoolean2) && (!((BaseActivity)this.mContext).loadingDialog.isShowing())) {
((BaseActivity)this.mContext).loadingDialog.show();
}
}
for (;;)
{
lastRequestType = paramInt;
Log.d("httpRequest", "httpRequest发送");
this.paseUtil = new BasePaserMessageUtil();
String str = initUrl(paramInt);
this.httpTask = new HttpTask(paramInt, this.mHandler, str, this.mContext, paramMap, paramBoolean1, paramClass, this.paseUtil, paramBoolean3);
HttpTask localHttpTask = this.httpTask;
Executor localExecutor = AsyncTask.THREAD_POOL_EXECUTOR;
RequestMethod[] arrayOfRequestMethod = new RequestMethod[1];
arrayOfRequestMethod[0] = RequestMethod.POST;
localHttpTask.executeOnExecutor(localExecutor, arrayOfRequestMethod);
if (this.controlcurrentThread == null) {
break;
}
this.controlcurrentThread.getControlcurrentThread(this.httpTask);
return;
if (((this.mContext instanceof BaseFragmentActivity)) && (paramBoolean2) && (!((BaseFragmentActivity)this.mContext).loadingDialog.isShowing())) {
((BaseFragmentActivity)this.mContext).loadingDialog.show();
}
}
}
}
|
从代码看,这里的内容几乎就是发送的过程了。虽然不是太明白,但是大致内容就是发起了一个http请求,这个请求能够将我们的数据存放在服务器上的数据库中。
然后这里应该是将我们的数据上传,然而这个位置的str1的地址是啥呢?感觉这里不弄清楚就没有办法继续下去了。。
想起来比赛时候下载的BeCompare,于是将Constants.class导入,查找BASEURL,发现为
http://58.213.141.235:8080/qmjs_FEP/
那么也就是说,发送的地址就为:
http://58.213.141.235:8080/qmjs_FEP/datewalk/createSportTrack.action
这个地址就会将我们的数据上传上去。然后我们尝试访问
http://58.213.141.235:8080/qmjd_FEP
发现内容为

感觉已经很接近了,我们尝试访问我们的createSportTrack:

访问失败?看起来我们必须伪造一份请求数据(还的是json),然后里面有要求的元素的场合,我们才有可能成功访问。。。
那么我们回到原先的代码,看看都传输了什么数据过去:
1
2
3
4
5
6
7
8
9
10
11
12
13
14
15
16
17
18
19
20
21
22
23
24
25
26
27
28
29
30
31
32
33
34
35
36
37
38
39
40
41
42
43
44
45
46
47
48
49
50
51
52
53
54
55
56
57
58
59
60
61
62
63
64
65
66
67
68
69
70
71
72
73
74
75
76
77
78
79
80
81
82
83
84
85
86
87
88
89
90
91
92
93
94
95
96
97
98
99
|
private void savePoints()
{
...
HashMap localHashMap = new HashMap();
GPSRouteActivity.this.checkLoginInfo();
localHashMap.put("userId", BodyBuildingUtil.mLoginEntity.getLoginEntity().getUserId());
String str1;
if ((GPSRouteActivity.this.gpsPositionModules != null) && (GPSRouteActivity.this.gpsPositionModules.size() > 0))
{
localHashMap.put("latitude", ((GPSPositionModule)GPSRouteActivity.this.gpsPositionModules.get(-1 + GPSRouteActivity.this.gpsPositionModules.size())).getLat() + "");
localHashMap.put("longitude", ((GPSPositionModule)GPSRouteActivity.this.gpsPositionModules.get(-1 + GPSRouteActivity.this.gpsPositionModules.size())).getLng() + "");
localHashMap.put("sportDuration", GPSRouteActivity.this.mTv_sport_time.getText().toString());
localHashMap.put("mileage", 1000.0D * Double.parseDouble(GPSRouteActivity.this.mTv_sport_km.getText().toString()) + "");
localHashMap.put("sportType", GPSRouteActivity.this.sportType);
localHashMap.put("positions", GPSRouteActivity.this.gpsPositionModules);
if (GPSRouteActivity.this.saveToTraget)
{
localHashMap.put("targetId", ((TargetModel)GPSRouteActivity.this.targets.get(GPSRouteActivity.this.chooseposition)).getTarget_release_id());
localHashMap.put("teamId", ((TargetModel)GPSRouteActivity.this.targets.get(GPSRouteActivity.this.chooseposition)).getTeam_ref_id());
}
localHashMap.put("pedomType", "2");
if ((GPSRouteActivity.this.isOK == null) || (GPSRouteActivity.this.isOK.equals("0"))) {
break invalidCount;
}
if (!GPSRouteActivity.this.isOK.equals("1")) {
break beginCount;
}
str1 = "0";
label394:
localHashMap.put("isQualify", str1);
if (!GPSRouteActivity.this.isOK.equals("3")) {
break label602;
}
}
int i;
StringBuffer localStringBuffer;
beginCount:
label602:
for (String str2 = "3";; str2 = "1")
{
localHashMap.put("pedomType", str2);
i = 0;
localStringBuffer = new StringBuffer();
for (int j = 0; j < GPSRouteActivity.this.qmrtb.getTaskPointList().size(); j++)
{
if (((QueryMornRunTaskBean)GPSRouteActivity.this.qmrtb.getTaskPointList().get(j)).isComplete()) {
i++;
}
localStringBuffer.append(((QueryMornRunTaskBean)GPSRouteActivity.this.qmrtb.getTaskPointList().get(j)).getTaskId() + ",");
}
Configuration localConfiguration = new Configuration(GPSRouteActivity.this.getApplicationContext());
localHashMap.put("latitude", localConfiguration.getString("geoLat"));
localHashMap.put("longitude", localConfiguration.getString("geoLng"));
break;
str1 = "1";
break label394;
}
localHashMap.put("pointCount", "" + i);
localHashMap.put("taskIds", localStringBuffer.toString());
invalidCount:
localHashMap.put("invalidCount", "" + GPSRouteActivity.this.invalidCount);
GPSRouteActivity.this.http.httpRequest(5307, localHashMap, false, SaveRouteResult.class, true, false);
return null;
}
protected void onPostExecute(Void paramAnonymousVoid)
{
super.onPostExecute(paramAnonymousVoid);
}
}.execute(new Void[0]);
}
|
从分析上看,这一段代码主要是在完成我们的跑步路线的设置,而我们的登陆过程显然不是在这里完成的,注意到一个函数:
GPSRouteActivity.this.checkLoginInfo();
这个函数将会检查我们的登陆信息,这个函数内容为
1
2
3
4
5
6
| public void checkLoginInfo()
{
if (!StringUtil.isNotEmpty(BodyBuildingUtil.mLoginEntity.getLoginEntity().getUserId())) {
BodyBuildingUtil.mLoginEntity = new DataBaseManager(this).selectUserMessage();
}
}
|
就是一个简单的检查函数,关键就是这个BodyBuildUtil这个对象,里面似乎会存放我们的【个人登陆信息】。检查过程就不贴出来了。因为数据量太大了。。。想要看出来好像有点麻烦。。。。。。
所以我选择了ask question,结果居然是sun it
卧槽
惊了

以我的水平目前还是做不到的。。。这里就先搁着了。
3.6
学习了一下抓包的技巧,再次记录
首先让手机连接电脑打开的wifi,然后打开burpsuite
找到proxy下的options选项
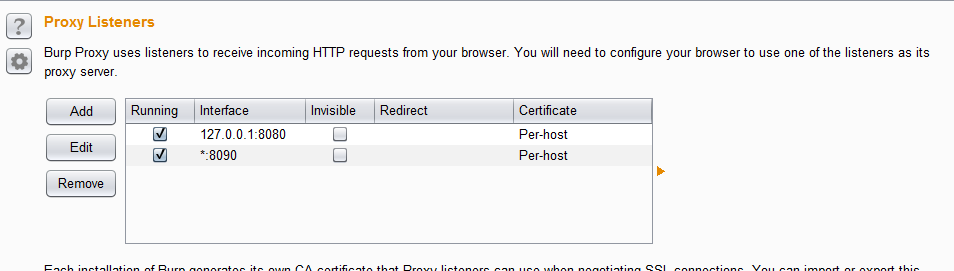
然后选择add监听更多端口,并且设置如下:
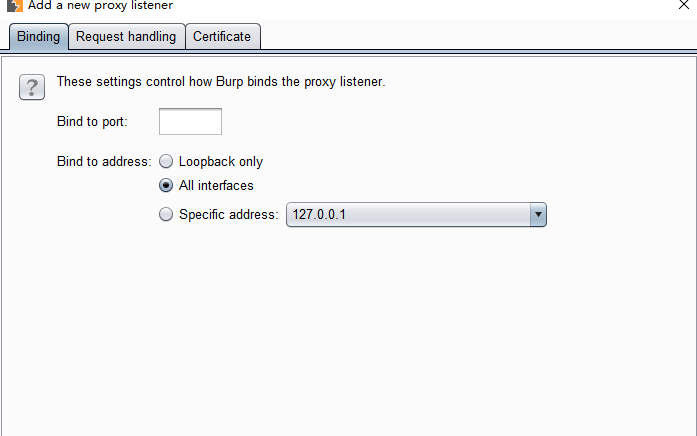
接下来我们进入手机wifi的设置,设置无线的代理配置如下:
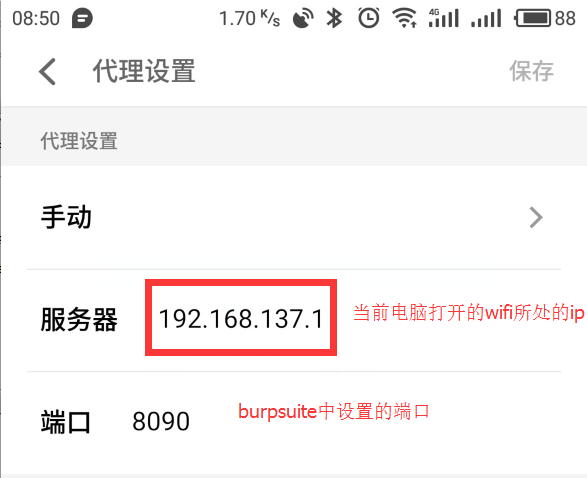
就能够通过burpsuite抓取手机上的数据包了!接下来我们查找有关http://58.213.141.235:8080/qmjs_FEP/datewalk/createSportTrack.action url的数据包,结果发现为:


原地爆炸!
这个body是个什么鸡!!!!!!!!!!为什么这么长长长长。。。。。。。。。。。仔细想了一下,header中并没有提到我们的奔跑数据,那么这个位置上的数据,就应该是我们GPS所记录的奔跑数据了。